Bulk Transaction
Screen Type: Workflow
Screen ID: WORKFLOW-004
Bulk transactions generally refer to transactions with a product load volume greater than 10,000 gallons. Bulk transactions might include product loads on barges, into pipelines, or moving products between tanks at the terminal. In addition, when a terminal receives product, these receipts are also typically considered bulk transactions. A characteristic of bulk transactions is that they can be entered and reported in bulk units, such as Barrels, Tons, cubic meters, etc.
Bulk transactions tend to be used for upkeep of the terminal, such as transferring products between suppliers and between terminals. Due to the size and business nature of bulk transactions, they are typically manual transactions; that is, they are not initiated at a load rack but are instead manually initiated through the TMS7 Web UI.
To access the Bulk Transactions screen, complete the following:
-
On the TMS7 Home screen, search for 'Bulk Transactions' in the home screen search bar.
-
Select 'Bulk Transactions.'
-
Alternatively, a user can navigate to this screen using the Manual Transactions menu:
-
Select the Manual Transactions menu.
-
Select 'Bulk Transactions.'
-
See Screen Layouts for a description of the Bulk Transactions screen layout and fields.
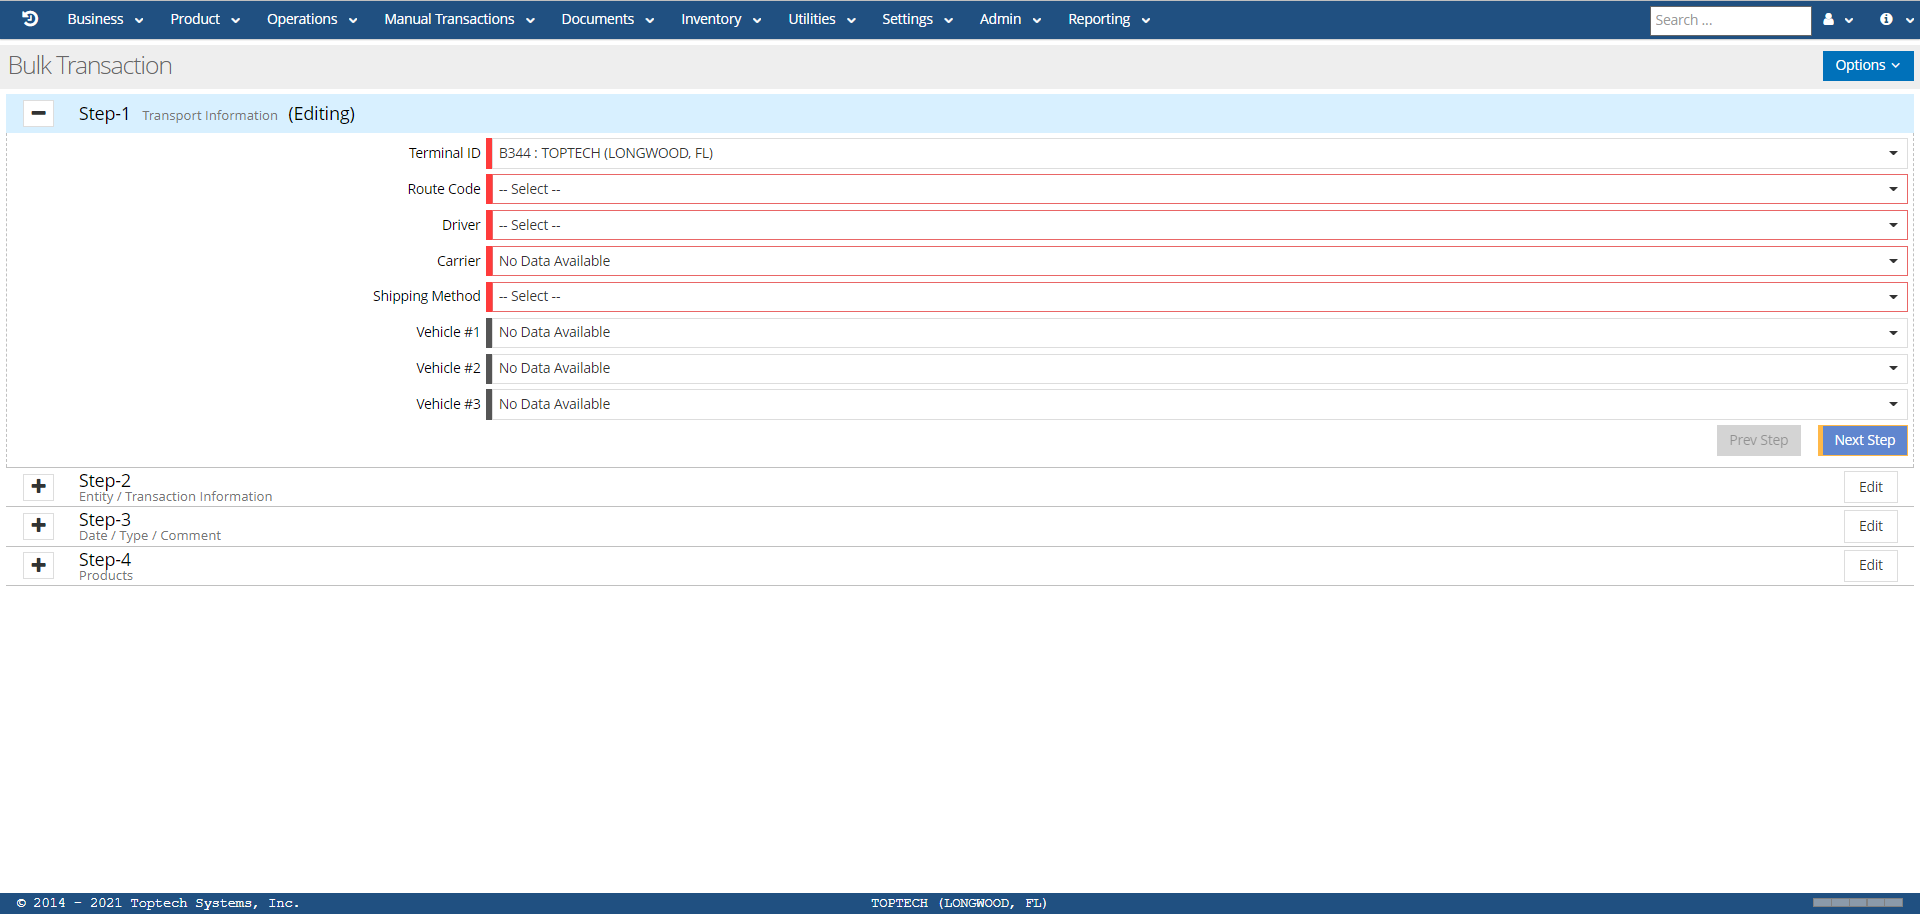
The Non-Bulk and Bulk transaction screens are separated into 4 steps, each with required fields that must be completed in order for a transaction to be processed. Select the 'Edit' button to edit a specific step, or use the 'Prev Step' and 'Next Step' buttons to move back and forth between steps. Selecting the '+' or '--' will collapse or expand the step to show what fields are located in each step. Fields with a red border are required, and fields with a gray border are optional.
Step 1
Step 1 defines transport details for the transaction, including carrier selection and shipment method.

| Field | Description |
|---|---|
| Terminal ID | Select a terminal from the drop-down menu. |
| Route Code |
Select a route code from the drop-down menu. The Route Code is an internal TopHAT routing address that designates where generated documents or data such as BOLs, reports, invoices, transactions, database modifications are sent to be printed, faxed, e-mailed, transmitted, etc. The default route code for printing documents is LPRNT. |
| Driver | Select a driver from the drop-down menu. Drivers must already be defined via the Drivers screen. |
| Carrier | Select a carrier from the drop-down menu. Carriers must already be defined via the Carriers screen. |
| Shipping Method |
Select a shipping method. Options include:
|
| Vehicle #1 | The Vehicle #1 field will always display truck or tractor vehicle types. If the selected carrier has these vehicle types configured, then you can select a truck or tractor from the drop-down menu. |
| Vehicle #2 | The Vehicle #2 field will display trailers and pups configured for the carrier; select an option from the drop-down menu for what vehicle will be used in this transaction. |
| Vehicle #3 | The Vehicle #3 field will display trailers and pups configured for the carrier; select an option from the drop-down menu for what vehicle will be used in this transaction. |
Step 2
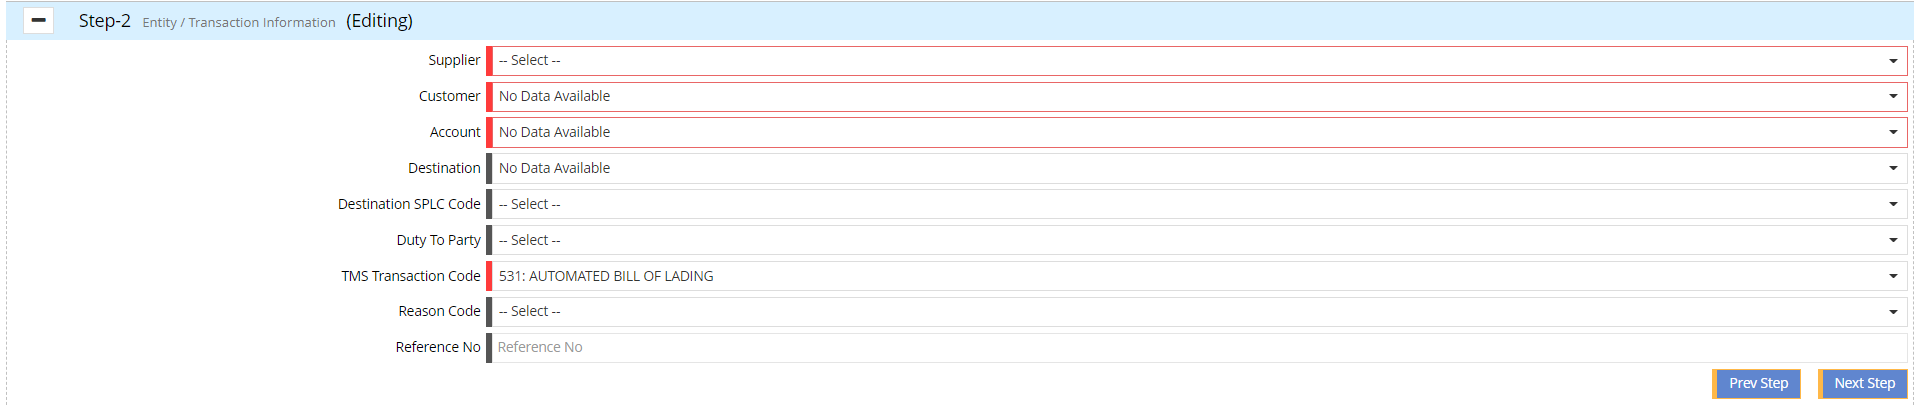
Step 2 defines the business entity and transaction information, including which supplier is supplying product for the transaction, what customer or account is receiving the transaction, and where the transaction is being shipped to.
| Field | Description |
|---|---|
| Supplier | Select a supplier from the drop-down menu. Suppliers must first be defined via the Suppliers screen. |
| Customer | Select a customer from the drop-down menu. Customers must first be defined via the Customers screen. |
| Account | Select an account from the drop-down menu. Accounts must first be defined via the Accounts screen. |
| Destination | Select a destination from the drop-down menu, if applicable. Destinations must first be defined via the Destinations screen. |
| Destination SPLC Code | Select an SPLC code from the drop-down menu, if applicable. A Destination SPLC Code is used to indicate a specific state and city, and is defined on the Destination SPLC screen. |
| Trans ID |
Select a TMS Transaction Code from the drop-down menu. The TMS Transaction Code defines the type of transaction, such as Weigh Scale BOL or Inter-Company Delivery. Commonly used Non-Bulk Transaction IDs include:
Commonly used Bulk Transaction IDs include:
Transaction IDs can be defined via the Transaction Code Definition screen. Contact Toptech for more information on this screen. |
| Reason |
Select a reason code from the drop-down menu. Reason Codes are defined via the Reasons Code screen. Reason Codes are associated with transactions when the Trans Reason Required flag is enabled on the Transaction Value Table for a specific transaction ID. They inform the home office why operators or stock analysts have entered a manual transaction. When entering a manual transaction, a user may select the appropriate reason code from the Reason Code field. Typical transactions requiring reason codes are Stock Adjustments and Meter Adjustments. Note: Reason codes are for documentation purposes only and do not affect data processing. |
| Duty To Party | Select a Duty to Party from the drop-down menu. These options are defined via the Partners screen. |
| Reference No | Enter a unique reference number for this transaction. |
Step 3
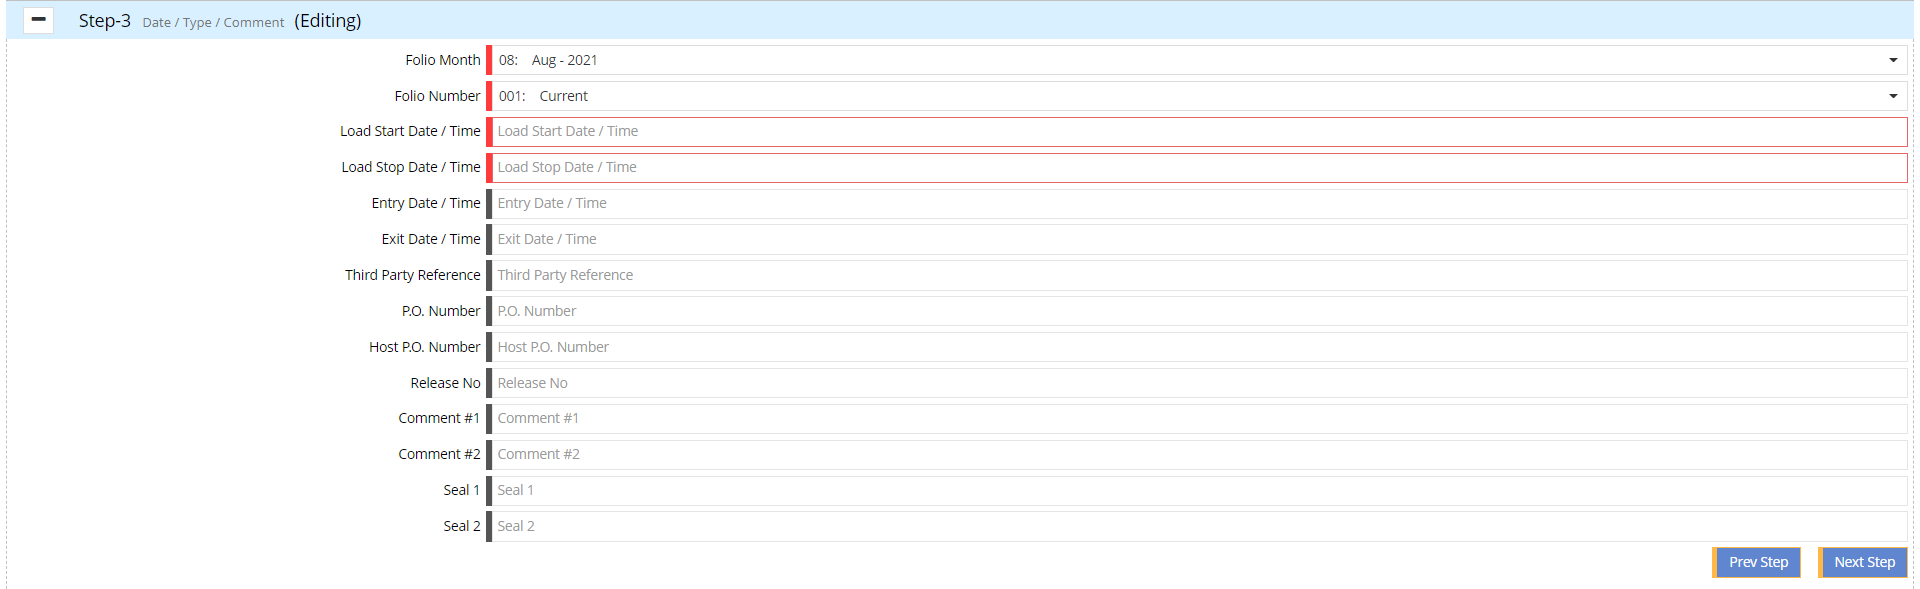
Step 3 provides details on when the transaction occurred and any other special comments/details related to the transaction.
| Field | Description |
|---|---|
| Folio Month | Select the folio month from the drop-down menu for when this transaction occurred. |
| Folio Number | Select a folio number from the drop-down menu. The options that appear in this field will be determined by which folio month selected and whether that folio is frozen or current. |
| Load Start Date/Time | Select the date and time at which the load transaction will begin. This is a calendar and time select field, with times listed in 15 minute increments. |
| Load Stop Date/Time | Select the date and time at which the load transaction will conclude. This is a calendar and time select field, with times listed in 15 minute increments. |
| Entry Date/Time | Select the date and time at which the carrier will enter the terminal to begin the transaction. This is a calendar and time select field, with times listed in 15 minute increments. |
| Exit Date/Time | Select the date and time at which the carrier will exit the terminal after completing the transaction. This is a calendar and time select field, with times listed in 15 minute increments. |
| Third Party Reference | If there is a third party involved in the transaction, enter the business entity's name in this field. |
| P.O. Number | If there is a Purchase Order associated with the transaction, enter the P.O. number in this field. |
| Host PO Number | The Host PO Number is the number entered by the driver at the RCU or Multiload for remote host tracking. |
| Release Number | If a release number is required for transactions to occur, enter that number in this field. |
| Comment #1-2 | Use these fields to add any comments related to the manual transaction; each field has a maximum of 40 characters. |
| Batch Number | If there is a batch number associated with the transaction, enter that number in this field. |
| Seal 1-2 | If the transaction includes secured products that require and use safety seals, enter the seal numbers in these fields. |
Step 4
Step 4 is used to define which products will be included in the transaction. When you select 'Add New Detail' and select a product from the drop-down menu, you will be given fields used to specify the parameters for the transaction of that product. In addition, beneath the fields where you define the product transaction parameters, the base products used in creating the selected product recipe will automatically be listed for that product (see image below).

| Field | Description |
|---|---|
| Unit of Measure | Select a unit of measure from the drop-down menu. Selecting a unit will configure detail fields to show data in either Gallons or Barrels; the screen will accordingly adjust decimals and numeric differences. |
| Show/Hide Base Unit Qty | Enables the user to show the initial product base level before additives or other injectables are added. |
| Override Volume Calculation | Selecting this option allows you to override the volume calculations performed by TMS7. |
| Product ID | Select a product from the drop-down menu. |
| Bay | Select the bay from the drop-down menu where the transaction happened. |
| Preset | If applicable, select a preset from the drop-down menu. Presets are defined via the Presets screen. |
| Temperature (F) | The temperature of the product at the time of loading. |
| Gravity/Density (API) | The product gravity value. |
| Gross (bbl) | Gross volume loaded. |
| Net (bbl) | The net volume corrected to standard conditions loaded. |
| Vehicle | Select a vehicle from the drop-down menu that will be the carrier of the product. |
| Compartment | If the vehicle has multiple compartments, specify which compartment will be used for this transaction using the drop-down menu. |
| Ticket # | The third-party reference number associated with the transaction. |

| Field | Description |
|---|---|
| Product ID | Displays the product ID of the base product in the selected transaction product. |
| Meter | Select a meter from the drop-down menu. |
| Tank | Select which tank the product is being stored in. |
| Temperature (F) | The temperature of the product at the time of loading. |
| Gravity/Density (API) | The product gravity value. |
| Pressure (p) | The pressure of the product at time of loading. |
| Gross (bbl) | Gross volume loaded. |
| Net (bbl) | Net volume corrected to standard conditions loaded. |
| Product Weight (lb) | The product weight. |
Net Calculations and Override Volume Calculation Option
TMS7 will automatically adjust Gross and Net volume calculations for a product when entered in step 4 of the Bulk and Non-Bulk transaction screens; that is, when a Gross volume is entered, the Net volume will automatically be calculated by TMS7. Additionally, TMS7 has functionality for backwards calculation; if you enter a Net volume, TMS7 will calculate the Gross quantity needed. If the saleable product is comprised of multiple base products, TMS7 will automatically calculate the volumes needed of each base product to equal the desired saleable product volume (see image below).

If you do not want TMS7 to automatically calculate net or gross volumes, you can select the 'Override Volume Calculation' box; this will allow you to edit the Gross or Net volume fields without TMS7 automatically adjusting the other volumes.
Transaction Template Option
The transaction template feature allows you to create and load templates to make creating transactions easier. The transaction template, when loaded, will automatically fill out each of the steps with the values defined in the template. This feature is especially useful if a terminal frequently processes transactions with the same parameters using the manual transaction screens. This feature is a modal screen that appears on both the Bulk and Non-Bulk Transaction screens and is accessed through the Options menu.
To Create a Transaction Template
Transaction Templates are created by saving a completed Bulk or Non-Bulk transaction record as a template prior to submitting the transaction for processing; all values entered on the transaction record will be the values assigned to the template. To create a new template based on a transaction record, complete the following:
-
Fill out all desired fields of the transaction record (on either the Bulk or Non-Bulk Transaction screen).
-
Before submitting the transaction record, select the Options Menu.
-
Select Transaction Template.

-
Click the down arrow on the Template menu to display the template add/search field.
-
Enter a name for the template in the text field.
-
Select +Add.

-
Select 'Save' to save the template.

-
The template will now appear as a template option in the Template menu drop-down.
To Load a Transaction Template
Transaction templates can be loaded to automatically fill out a new transaction record. To load a template:
-
Open a new Bulk or Non-Bulk Transaction record by navigating to either screen.
-
From the Options menu, select Transaction Templates.
-
Select a template from the drop-down menu.
-
Select Load.
-
The record will automatically be populated with field values as defined in the template.
To Remove a Transaction Template
In the event that you want to remove a template from a transaction record after applying one, simply select Remove from the Transaction Template modal screen.
Modifying/Cancelling Bulk Transactions
Bulk and Non-Bulk Transactions can be managed through the Transaction Viewer screen under the Operations menu. See Transaction Viewer for more information on this screen and how to modify or cancel transactions.